How to fix Windows Update Errors Part 5: Method 6-14
Method 6: Delete Temporary update Files at Software Distribution
Method 7: Doing the System File Checker (Sfc) & Deployment Image Servicing and Manangement (Dism)
Open an elevated command prompt, type the following and hit Enter.
sfc /scannow
Open an elevated command prompt, type the following and hit Enter.
dism.exe /online /cleanup-image /scanhealth
Once the operation completes successfully, type the following and hit Enter.
dism.exe /online /cleanup-image /restorehealth
Method 8: Re-configure Internet Connection
Step 1. Go to Control Panel.
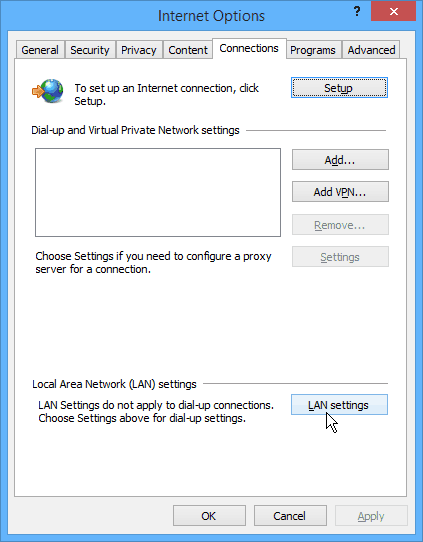
Step 2. Change view to "Small." And then click on Internet Options
Then click the Connections tab and then LAN Settings.

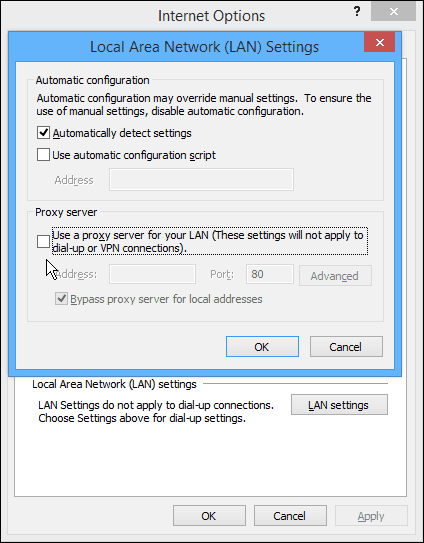
From the LAN Settings, under Proxy Server, check “Use a proxy server for your LAN…” then you can click the Advanced button.

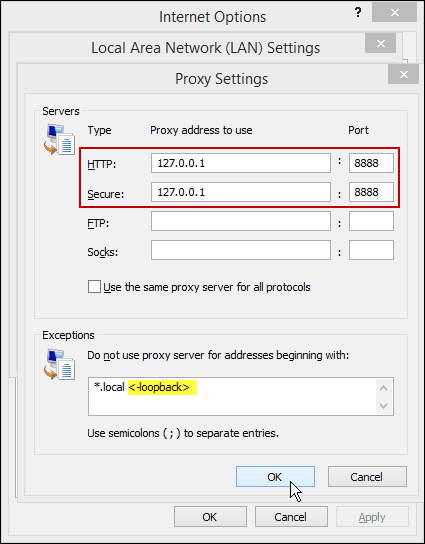
Next comes the Proxy Settings and make sure your entries look like the image below.
- HTTP: 127.0.0.1 Port: 8888
- Secure: 127.0.0.1 Port: 8888
- Exceptions: <-loopback>

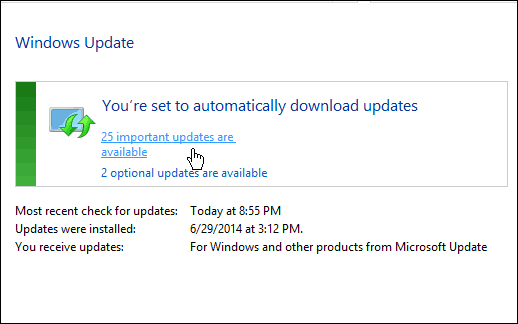
After that, go back an try to run Windows Update again, and it should work finally.

After you install the updates, go back to LAN Settings and uncheck “Use proxy server for your LAN…” otherwise you won’t be able to go to any webpages since your proxy is your own computer.

Method 8: Make the time and Date up to date
Another thing that causes the Windows Update to fail is incorrect time and date settings. Please make sure it is correct.
Method 9: Clear the Windows Update Cache
Clearing the Windows Update Cache usually does the trick for a wide range of Windows Update related problems. To clear the cache, navigate to the C:\Windows\WinSxS\ folder, then look for the file called "pending.xml". Left click it, then right click over top of the filename and rename it to "pending_old.xml" or similar; renaming the file will effectively 'reset' the Windows Update process. Once the file has been renamed, re-run the Windows Update again.
Method 10: Attempt Windows Update from a Clean Boot
Sometimes installed programs can interfere with the Windows Update process. To ensure that no programs are interfering with the Windows Update process, you can initiate a "Clean Boot" by following these steps:
a. Click Start and type in "msconfig" (no quotes) and press Enter.
b. Go to the Service Tab and checkmark "Hide all Microsoft Services".
c. Next, click on Disable All, then click Apply.
d. Click the Startup Tab and then "Open Task Manager" link (if present)
e. Select all items in the Startup tab list, then click Disable.
f. Click OK and have Windows reboot your computer
Note: once you have Windows Update working properly you can reverse these changes (if desired) by following the instructions in reverse.
Method 11: Unplug any removable media and reboot; try Windows Update again
As noted on Microsoft's website, having removable media such as an external hard drive or USB flash drive plugged in can cause Windows Updates to fail. Unplug any of these devices on your computer, reboot, and try the Windows Updates again.
Method 12: Scan the Hard Drive for Errors
If your file system is corrupt, this will cause Windows Updates to fail. That said, if you have surface errors on the hard drive this will cause files to become corrupt, Windows Update to fail, and may not be recoverable. To scan the file system for errors:
a. Click Start, then type in "this pc" (no quotes) and click on This PC when it shows up in the start menu.
b. Navigate to C drive and right click it, then select Properties.
c. Go to the Tools menu (tab) and under Error Checking, click Check Now.
d. Ensure Automatically Fix File System Errors in check marked, and click OK.
You will be prompted to reboot your computer. But before you do that, unplug any removable media and reboot as noted in suggestion #2.
Method 13: Delete Temporary Files In Windows 10
Learn how you can delete temporary files in Windows 10 and free up some space on hard disk so that you can use it for other purpose.
While visiting some websites on web, bits of data may be stored on your hard disk. Since these sites are using caching, so if you frequently visit them, some of their webpages are loaded directly from your hard disk instead of site’s web server. This helps you to browse the content faster. The data stored on your Windows comes under the name of temporary files.
Also when you install new software or apps on your Windows 10 , there are some temporary files which are created on your local disk. If the program you’re installing is well coded, it will automatically remove the temporary files it will create. While some programs may not be able to do so and their temporary files get stored permanently on the machine. Thus, then you need to clear files manually. In this article, we’ll see how to remove unnecessary or temporary files on your Windows 10.
See this article, if you’re looking forward to remove temporary files on Windows Phone .
How To Delete Temporary Files In Windows 10
1. Open Settings app and click/tap System.

2. Next, under System, look for Storage option in left pane. Then in the corresponding right pane, click/tap on your system root drive.

3. Then for the system root drive, you’ll be able to see how the drive space is being consumed.

Scroll down on the same screen and you’ll find the temporary files heading underneath which the space located for those files is mentioned. Click/tap the Temporary Files to get on the its details:

4. Finally, you have the option to clear temporary files. So hit the Delete Temporary files option and free up some space for your usage. Additionally, you can trash Downloads and Recycle Bingarbage and get even more space.

Or Simpley open an elevated command prompt and type the command:
%temp%
Delete all files there.
Or type the following command:
del /q/f/s %TEMP%\*
to automatically delete all temp files.
Or you can create a batch file to clear temp: Open notepad and copy paste the codes below and save it as .bat file:
@echo off
del /s /f /q c:\windows\temp\*.*
rd /s /q c:\windows\temp
md c:\windows\temp
del /s /f /q C:\WINDOWS\Prefetch
del /s /f /q %temp%\*.*
rd /s /q %temp%
md %temp%
deltree /y c:\windows\tempor~1
deltree /y c:\windows\temp
deltree /y c:\windows\tmp
deltree /y c:\windows\ff*.tmp
deltree /y c:\windows\history
deltree /y c:\windows\cookies
deltree /y c:\windows\recent
deltree /y c:\windows\spool\printers
del c:\WIN386.SWP
cls
Method 14: System Restore and Reset
The last resolution for this issue is doing the System Restore or Reset.

 , and then clicking
  If you're prompted for an administrator password or confirmation, type the password or provide confirmation.